
Angel Food Cake
Simple and Delicious
I’m going to say it, Angel Food Cake from a box is dang good!
So good in fact that after checking my favorite food bloggers to see if they had a recipe, they all feel the same as I do! Using the angel food cake as a base and adding sauces from scratch, or just eating it plain, it’s yum!
I’ve bought many angel food cakes from the grocery store bakery because #1 they weren’t expensive and #2 I was very intimidated to even try making one from a box! After I made one, I haven’t gone back to “bakery”.
For something so beautiful, they shouldn’t be so simple.

After looking at a few recipes, and seeing the time involved, I decided I’d go for the mix (I love a boxed cake mix doctored up). The directions showed that all you needed was the mix and water. This was too easy to taste good. Side note…I’d be very surprised if grocery store bakeries are making theirs from scratch!
Angel Food Cake Pan, or Bread Pans
These are your options for baking your Angel Food Cake
If you’ve seen an angel food cake pan you know it is in two pieces. Because of the way the cake rises, and the mixture itself, It will attach to the pan to continue rising. The angel food pan separates into two pieces to allow removal of the cake in one piece. As with the bread pan, You have a lot of edges you can take a knife around to help release the cake. I found my pan at a thrift store for $2. At the time, I figured if I continued making them I’d buy a new one. But, this one works perfect & I love that it looks like my mom & grandmas!
Let’s get that Angel Food Caked mixed!
First off, I like Betty Crocker, but I’m sure other brands are very comparable. I will say that Betty Crocker does have a fun fetti mix too, so that might take it over the top! Whichever box mix you choose, you’ll need to follow the directions specifically for it.
Make sure you listen when they say a MEDIUM BOWL (at least 8 cups). You’ll look at the amount of water and the pouch of mix and think you can fit it in a much smaller one…don’t try it. As soon as you start the mixers going you’ll see those egg whites come to life.
Start out on slow for one minute until all powder is mixed in, then increase it to medium. You’ll know it’s ready when you see see the results of sweet puffy white clouds. The mixture should be shiny and smooth and form “stiff peaks” (tips stand straight up without collapsing).
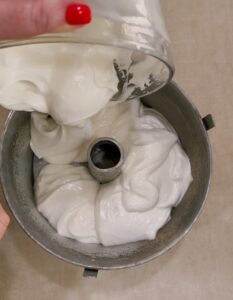
Carefully spoon batter into angel food cake pan, or two bread pans and spread evenly over top. DO NOT GREASE PANS
Bake according to directions on the box
Leave only the bottom rack in the oven, and move it to the bottom rung. Cake should rise up above pan edges and you don’t want it getting stuck to the other racks. Set a timer to check it, and the wait is on.

Clean up Clean up…you’ll be glad you did when the cake is done and the kitchen is clean!
Too often after baking for a while, I go sit down and take a rest before I clean up. I ALWAY REGRET ever stopping. It’s so much harder to get going again!
Angel Food Cakes are different than a normal cake
Letting your cake cool like a normal cake will not give you the results you are hoping for.
The spongy texture of an angel food cake is what sets it apart from other cakes. To achieve that texture, it needs to cool upside down.

Some angel food cake pans have “feet” similar to this. If yours does, you can simply place it upside down on the counter (the top will most likely touch the surface so make sure it’s clean). Otherwise, you’ll need a pop bottle or something similar in size that you can fit the hole of the cake pan over the neck of to balance on while it cools.
When using bread pans, turn them on their side to cool
Once cooled, the spongy cake will hold its shape.
It’s baked, and cooled, now what?
Removing the cake from the pan(s)
For an Angel Food Cake pan you’ll start by running a knife around the very top outer edge where it has possibly “spilled over” a little. Next run the knife around the edges down to the bottom of the pan, and same thing around the center. This should release the outer part of the pan. Once separated you can run your knife along the bottom of the pan to release the cake.
If you used bread pans, run a knife around the edges of the pan and hold pan upside down. Tap the bottom of the pan to help release cake.
Place cake upside down, or right side up….I’ll let you decide which way is which, I still don’t know, on a platter or plate.

If you try cutting your cake with any old knife you’ll have a gooey mess and squished cake.
Make sure when cutting your cake you use a good serrated knife, or even better, an electric knife.
To store, cover with plastic wrap, or place a large bowl upside down to cover. Can be stored at room temperate or refrigerated.
The possibilities are endless when it comes to what to top it with!
-Fresh berries and whipped cream – Pie filling – Lemon curd – Chocolate frosting – A yummy syrup or glaze
I don’t know why we don’t make these more often. All of my family loves them, and they really are quite simple.
Happy Baking and remember…If you Feed Them, They Will Come!
CATEGORY
8/22/2025
POSTED
Angel Food Cake
